Author: admin

  • Why PCs Take Longer to Start or Restart

    Why PCs Take Longer to Start or Restart

    A slow boot, a slow restart, and a slow shutdown after updates can all feel like the same annoyance. They are not usually the same thing.

    Sleek home office setup with multiple monitors, keyboard, smartphone, and stylish decor.
    Photo by Jakub Zerdzicki on Pexels.

    If a PC is slow every morning, the usual causes are fairly mundane: a hard drive, too many startup apps, older hardware, or Windows dragging half your software collection in with it. If restarting takes longer than turning the PC on, that is often normal. And if shutdown or restart suddenly gets slower after Windows updates, Windows is often finishing work before it lets you back in.

    The useful part is spotting when the delay happens. That narrows the cause down quite a lot.

    Booting from off can be faster than restarting

    Many Windows PCs start faster from a shut down state than they do from a restart. Odd, but common.

    A big reason is Fast Startup. With that enabled, Windows does not always do a completely fresh boot after a normal shutdown. It saves part of the system state to disk, then reloads it next time. Less work, shorter wait.

    A restart usually does the full job instead. Windows closes apps, stops services, unloads drivers, and starts cleanly. That takes longer, but it is also why restart is the better test when a PC is behaving strangely. It clears more of the leftovers out.

    So if your PC restarts more slowly than it starts from “off,” that does not tell you much by itself. It may just be doing more work.

    What tends to slow boot time down

    If startup is slow every time, the pattern matters more than one exact number on a stopwatch.

    The biggest divider is still storage. A PC running Windows on an SSD will usually feel much quicker at boot than one still relying on an old hard drive. The processor and RAM still matter, but slow storage affects the whole experience: loading Windows, signing in, opening startup apps, and reaching a desktop that is actually usable rather than technically present.

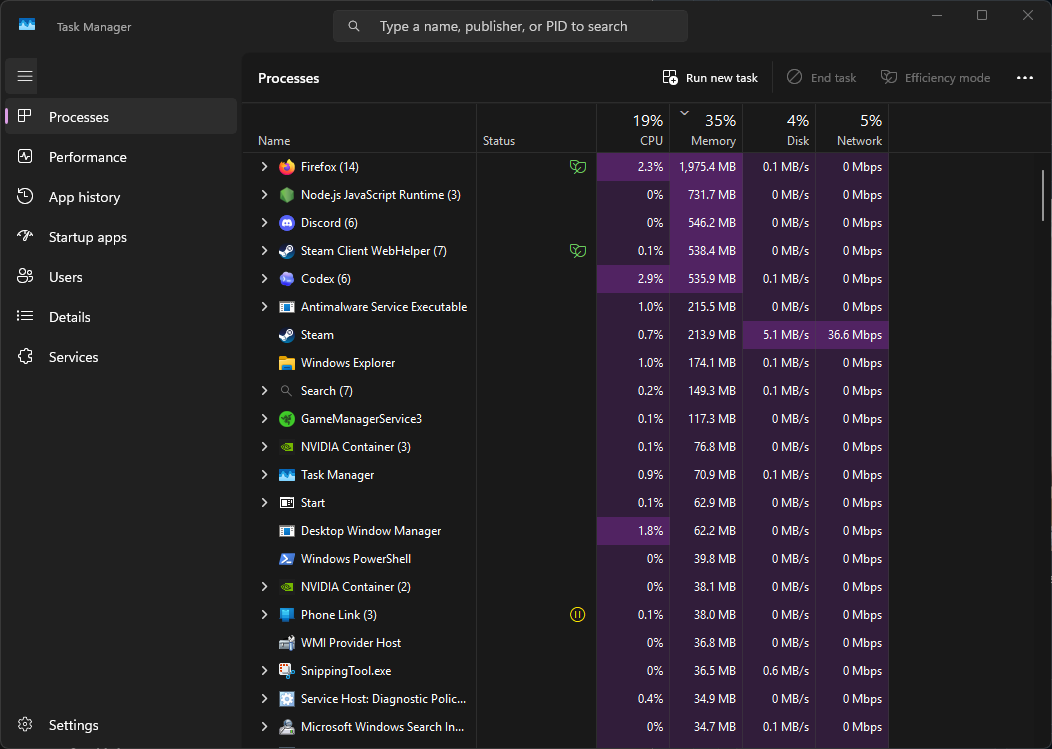
    Startup apps are the next obvious culprit. Windows may load, but then you wait while game launchers, chat apps, sync tools, hardware utilities, printer software, and assorted background helpers all wake up and demand breakfast. That is why a system can seem to boot quickly and still feel sluggish for another minute.

    You can check this in Task Manager > Startup apps. If a long list of software is set to launch at sign-in, trimming it often helps more than people expect.

    Older or lower-spec hardware adds to the delay. Limited RAM, an aging CPU, and years of installed software do not have to cause a dramatic failure to make a PC feel slow. They just stack up. A machine with 4GB or 8GB of memory and several background tools running at once can spend a while getting itself together.

    Sometimes the holdup starts before Windows even reaches the login screen. In that case, drivers, storage devices, USB hardware, or firmware checks may be part of it. If the delay mostly happens after login, startup apps and Windows services are more likely.

    Why restart can drag on

    Restarting is not just “shutdown, then power on again.”

    Before the system comes back up, Windows has to close running applications, stop background services, end user sessions, and prepare for a clean boot. If one program refuses to close properly, or a service takes its time, restart sits there and waits. Sometimes Windows tells you which app is causing it. Sometimes it just stares back with spinning dots and no useful personality.

    This is also why a PC can feel quick from a normal shutdown but slow on restart, especially if Fast Startup is enabled. The two paths are not doing the same amount of work.

    Updates make shutdown and restart slower for a reason

    A sudden slow shutdown or restart after updates is usually not a sign of failing hardware. It is more often Windows finishing the update in stages.

    Some parts of an update can be installed while you are using the PC. Other parts are saved for shutdown or restart, where Windows can replace system files, apply security changes, configure drivers, and clean up older components without everything being live at once.

    If you see messages like Working on updates, Don’t turn off your computer, or Getting Windows ready, the delay is usually expected.

    What matters is whether it only happens around updates. If shutdown or restart is slow once in a while right after patching, that points to Windows maintenance. If every shutdown is slow, including on days with no update activity, look elsewhere.

    Slow shutdown without updates usually means something is hanging

    When there is no update in progress and shutdown still takes ages, Windows is often waiting for software or a driver to stop properly.

    Common causes include:

    • an app that will not close cleanly
    • a background service taking too long to stop
    • security software still doing work
    • sync software finishing file activity
    • a driver issue
    • an external device holding things up

    This kind of delay is often inconsistent. One shutdown is normal, the next is oddly slow. That usually points to something hanging rather than Windows deliberately doing scheduled maintenance.

    If Windows wants to restart for updates and you do not

    You can usually postpone an update restart, at least within reason.

    In Settings > Windows Update, Windows may let you:

    • pause updates for a limited time
    • set Active hours so automatic restarts avoid the times you normally use the PC
    • Schedule the restart for later if an update is already waiting

    If Windows is showing a prompt with Restart now and a scheduling option, use the scheduling option if the timing is bad. Clicking through prompts at speed is how people end up watching an update screen instead of finishing what they were doing.

    Once Windows has already started applying updates during shutdown or restart, stopping it is a bad idea unless the system is clearly frozen for an unusually long time. Interrupting updates can leave the machine in a worse state than the original inconvenience.

    What to check first

    If you are trying to improve startup or restart times, a few checks do most of the useful work.

    Start with startup apps. Too many of them is one of the most common reasons a PC feels slow after login.

    Then look at the system drive. If Windows is installed on a hard drive rather than an SSD, that alone can explain a lot of poor startup behavior.

    After that, pay attention to the pattern:

    • Slow every boot usually points to storage, startup load, or general system age
    • Slow mostly on restart is often normal, especially with Fast Startup enabled
    • Slow after updates is usually Windows finishing update work
    • Slow on shutdown with no updates involved leans more toward software, drivers, or connected devices

    That simple pattern check is more useful than it sounds. It tells you whether you are looking at normal behavior, accumulated clutter, or an actual problem worth chasing.

    Final thought

    A PC that restarts slowly is not necessarily unhealthy. A PC that takes its time after updates is often doing exactly what it says it is doing. The more suspicious case is a machine that is slow all the time, or only shuts down properly when it feels like it.

    Modern PCs are not always quick, but they are usually consistent. When the delay follows a pattern, the cause often does too.

  • Why Windows Is Busy Even When Your PC Is Idle

    Why Windows Is Busy Even When Your PC Is Idle

    Why Windows Is Busy Even When Your PC Is Idle

    An “idle” Windows PC is rarely doing absolutely nothing. If you stop using it and then open Task Manager, you may see some CPU activity, several gigabytes of RAM in use, disk reads and writes, or network traffic.

    Usually, that is normal.

    Windows uses quiet periods for jobs it would rather not run while you are actively using the machine: updates, indexing, security checks, cache management, sync activity, and general maintenance. The real question is not whether anything is happening. It is whether the activity settles down on its own, or keeps grinding away for far too long.

    Idle does not mean empty

    Windows treats idle time as a work window. If the system notices you are not typing, clicking, gaming, or compiling something expensive, it may use the gap for background tasks.

    Some of that work comes from Windows itself. Some comes from whatever else is installed: cloud sync apps, antivirus, launchers, motherboard utilities, printer software that should have retired years ago, and various other little residents of the system tray.

    On a reasonably modern PC with an SSD and enough RAM, much of this passes unnoticed. On an older machine, especially one still running a hard drive, idle activity can feel a lot less invisible.

    System Idle Process is not your problem

    One line in Task Manager causes a lot of unnecessary suspicion: System Idle Process.

    If it shows a high CPU percentage, that usually means your CPU is mostly free. It is not a task chewing through processor time. It is Windows counting unused CPU time and presenting it as a process.

    So if System Idle Process is at 92%, that generally means about 92% of the CPU is not doing anything useful or harmful. It is just available.

    RAM is a different story. High memory use while the PC seems idle is not caused by System Idle Process. If memory is occupied, it will be tied up by actual services, apps, drivers, caches, and background tools.

    Task Manager has many ways to be confusing. This is one of the classics.

    Why RAM fills up even when you are not doing much

    Windows does not try to keep RAM empty for appearances. Spare memory is often used for cache and standby data so programs and files can load faster later.

    That means “high RAM use at idle” is not automatically bad. It depends on what happens next.

    Common reasons memory stays in use include:

    • Windows caching recently used data
    • antivirus and security services staying loaded
    • cloud sync clients running in the background
    • browser processes that remain active after you close the main window
    • chat apps, launchers, RGB software, audio control panels, and vendor utilities
    • update services and preload components from other software

    This matters more on lower-memory systems. If a PC has 16GB or 32GB of RAM, a few gigabytes used in the background often changes nothing. On an 8GB machine, especially one with integrated graphics sharing system memory, idle usage can leave much less headroom.

    Then Windows starts paging more often, which means moving data between RAM and storage. On an SSD, that is still not ideal. On a hard drive, it is where “slightly busy” turns into “why is this taking ages.”

    Why Windows Update suddenly gets active when you walk away

    Windows Update tends to use idle time for the messier parts of its work. Downloading is only part of it. Updates also need to be unpacked, checked, staged, installed, and cleaned up afterward.

    That can mean bursts of:

    • CPU use
    • disk activity
    • network traffic
    • background servicing processes

    If the PC gets busy shortly after you stop using it, Windows Update is often part of the reason.

    This is more obvious on slower systems. A newer desktop may deal with update servicing quietly enough that you barely notice. An older laptop with a modest CPU and a hard drive can make the same process look far more dramatic.

    A short run of update activity is normal. Repeated heavy usage with no clear progress is less normal. If the same update keeps failing, or servicing activity seems to restart over and over for days, that points to a problem worth checking rather than ordinary housekeeping.

    A lot of “Windows activity” is not Windows

    Windows gets blamed for almost everything that happens in the background, sometimes deservedly, sometimes not.

    Many idle resource spikes come from third-party software sitting around waiting for an excuse to be important. Common offenders include:

    • cloud backup and sync apps
    • full antivirus suites
    • motherboard and laptop control software
    • RGB and peripheral utilities
    • game launchers
    • browser background tasks
    • backup software
    • printer tools

    Prebuilt PCs are especially prone to this. You buy one computer and receive a small committee of helper apps.

    If your system seems busier than it should be at idle, look at which processes are actually active. The answer is often less “Windows is doing something mysterious” and more “three utilities are checking for updates, syncing settings, and monitoring hardware for no useful reason.”

    Windows 11 and Automatic Maintenance

    Windows 11 groups various background tasks under Automatic Maintenance. That can include updates, security scans, diagnostics, and some optimization work.

    The basic design makes sense: do the boring jobs while the PC is not being used, pause if the user comes back, and try again later if needed.

    Whether it feels smooth depends a lot on the machine.

    Desktops that stay powered on for long stretches often finish this work quietly. Laptops are less predictable. They sleep, wake, switch power modes, and spend a lot of time closed before maintenance has finished whatever it started.

    You are more likely to notice maintenance activity if the PC has:

    • a low-power mobile CPU
    • limited RAM
    • a mechanical hard drive
    • aggressive battery-saving settings
    • lots of extra software running in the background

    So yes, a Windows 11 PC may look oddly busy after being left plugged in and untouched for a while. Often that is just maintenance finally getting a clear run at its to-do list.

    Why hardware changes the whole experience

    The same background tasks can feel trivial on one PC and deeply irritating on another.

    An SSD hides a lot of routine Windows behavior. More RAM hides even more. A decent modern CPU gets through maintenance and update work quickly enough that the system returns to idle before you have time to be annoyed by it.

    Older hardware is less forgiving.

    A hard drive makes every background task more visible because random disk access is slow. Limited RAM makes paging more likely. Low-power laptop processors can take long enough to finish basic servicing that normal background work starts to look suspicious.

    This is why two people can describe the same Windows behavior very differently. On one machine, idle activity means a few blips in Task Manager. On another, it means the disk sits at 100% and opening the Start menu feels ambitious.

    When to ignore it and when to investigate

    Brief bursts of background activity are ordinary. So is moderate RAM use at idle. Windows is not a museum exhibit. It is always doing some amount of maintenance and management.

    It is worth digging deeper if you see any of these patterns:

    • CPU usage stays elevated for a long time with no clear process doing useful work
    • disk usage remains high and the PC feels sluggish
    • memory use is so high at idle that opening everyday apps causes obvious slowdowns
    • the same update or servicing process repeats over and over
    • fans ramp up every idle period on a machine that did not used to behave that way
    • resource use drops only after closing or disabling third-party utilities

    If you are checking Task Manager, focus on the active processes using CPU, memory, disk, or network. Do not treat System Idle Process as a culprit. It is mostly a sign that the processor is waiting around.

    A PC that is briefly busy while idle is normal. A PC that never seems to finish being busy is where suspicion becomes reasonable.

  • Why Windows Uses CPU In The Background

    Why Windows Uses CPU In The Background

    Why Windows Does Odd Things

    Open Task Manager at the wrong moment and Windows can look faintly absurd. Runtime Broker is using CPU. WMI Provider Host is awake. Windows Modules Installer Worker is busy again. Desktop Window Manager is on the GPU, despite the fact you are mostly looking at a wallpaper and a browser.

    Most of the time, nothing is wrong. Windows uses quiet moments to catch up on maintenance, scanning, indexing, update work, hardware checks, and desktop rendering. Task Manager shows those jobs as separate processes, which makes one routine burst of background activity look like a small committee meeting.

    The useful question is not “why does this process exist?” It’s “what is Windows doing right now, and does it stop?”

    Windows is often busy precisely because you are not

    A PC can look idle and still be doing plenty behind the scenes. Windows tends to delay lower-priority work until you stop actively using the machine.

    That background work often includes:

    • update installation and cleanup
    • malware scans
    • search indexing
    • hardware and software status checks
    • app permission handling
    • diagnostic or compatibility data collection
    • drawing and compositing the desktop through the GPU

    This is why CPU or disk usage often rises a few minutes after startup, after an update, after plugging in a device, or after copying a pile of files. Windows sees spare time and fills it.

    On a newer desktop with an SSD and a decent CPU, you may barely notice. On an older laptop with a hard drive and two struggling cores, the same job can feel far more dramatic.

    Task Manager makes one job look like five

    Part of the confusion is how Windows splits work across components.

    You may see:

    • Service Host running one or more system services
    • Windows Modules Installer Worker handling update servicing
    • Windows Defender scanning changed files
    • Windows Search Indexer updating the search database
    • WMI Provider Host answering system queries
    • Compatibility Telemetry collecting update and reliability data
    • Runtime Broker dealing with app permissions or background app activity
    • Desktop Window Manager using the GPU to draw the desktop

    Those are not always separate problems. Often they are parts of the same chain of events.

    Install updates, for example, and Windows may service components, scan the changed files, update its search index, check compatibility status, and redraw bits of the interface along the way. Task Manager then presents the lot as if each process woke up independently and chose chaos.

    Updates are behind a lot of this

    If several odd-looking processes are active at once, updates are one of the first explanations to consider.

    Windows Modules Installer Worker is the obvious one. It handles Windows component servicing: installing, modifying, and cleaning up system files. It often stays active after an update appears to be finished because Windows is still validating files, rebuilding caches, or removing old update data.

    That can mean noticeable CPU and disk use after:

    • monthly Windows updates
    • feature updates
    • enabling or disabling optional Windows features
    • the first reboot after patching

    A short spell of heavy activity here is normal. A machine that keeps doing it for hours across multiple restarts may have an update problem rather than routine cleanup.

    Service Host often appears at the same time, though it tells you less by itself. It is a wrapper for Windows services, not a single service with one clear job. If Service Host is using CPU, the important part is which service inside it is active. During update work, that may be tied to Windows Update, cryptographic services, installer services, or something adjacent.

    This is one reason Task Manager can be misleading. “Service Host is busy” is a bit like saying “a van is parked outside.” True, but not specific enough to settle anything.

    A quiet desktop is when Defender likes to work

    A very common sight is Windows Defender using CPU while the PC appears to be doing nothing.

    That is usually deliberate. Defender prefers to scan when the machine is idle or less busy. You stop working, Windows takes the opportunity to inspect recent downloads, changed files, removable drives, or whatever else has piled up.

    You are more likely to notice this after:

    • startup
    • downloading or extracting a lot of files
    • connecting USB storage
    • security definition updates
    • long gaps since the last scan

    How annoying this feels depends heavily on the hardware. On a modern CPU with fast storage, Defender may just flicker in Task Manager and move on. On an older PC, especially one still running a hard drive, the same scan can drag the whole system down and announce itself with fan noise.

    If Defender is constantly heavy, not just occasionally active, look at the workload around it. Large archives, developer folders full of small files, virtual machine images, and a second antivirus product can all make scanning more expensive than it needs to be.

    Search indexing can look suspicious, but it usually has a reason

    Windows Search Indexer exists so Start menu and File Explorer searches return results quickly instead of rummaging through the drive every time.

    To do that, Windows builds and updates a search index in the background. That activity tends to spike after large file changes, initial setup, email sync, or any event that gives the indexer fresh material to chew through.

    Common triggers include:

    • setting up a new PC
    • moving or copying lots of files
    • rebuilding the search index
    • syncing Outlook or another indexed app
    • adding indexed folders from another drive

    The pattern matters here. A temporary burst after a lot of file activity is ordinary. An indexer that keeps returning to the same high CPU or disk use may be dealing with a corrupted index, a troublesome folder, or too many locations being indexed for little benefit.

    This is another place where storage speed changes the story. On SSDs, indexing is usually tolerable. On old hard drives, it can feel like the PC has decided to think very hard about documents you forgot existed.

    WMI, telemetry, and the business of Windows checking itself

    Some Windows processes are not doing visible work for you at all. They are gathering information about the system, hardware, drivers, software state, and update readiness.

    That is where WMI Provider Host and Compatibility Telemetry usually enter the picture.

    WMI Provider Host

    WMI Provider Host is part of Windows Management Instrumentation, which is an unnecessarily long name for a fairly simple idea: it lets Windows and other software ask questions about the system.

    Screenshot 2026 05 12 103703

    Those questions might be about:

    • installed hardware
    • drivers
    • services
    • sensors
    • event data
    • device status

    Short WMI spikes are common after startup, hardware changes, driver installs, and software installs. Monitoring tools, motherboard utilities, RGB software, enterprise management tools, and some security products all like to query WMI. Some of them like it a bit too much.

    If WMI Provider Host keeps using CPU, the host process is often just the messenger. Another program may be polling it repeatedly, failing a query, or triggering the same error loop over and over.

    Compatibility Telemetry

    Compatibility Telemetry is tied more closely to diagnostics, update readiness, and reliability data. It tends to appear around updates, software changes, or maintenance cycles, and it may use CPU, disk, and some network activity while it gathers and processes that information.

    This often overlaps with update servicing. Windows is not doing random busywork here; it is checking what is installed and whether the system is likely to behave after the next round of changes. On slower PCs, especially older systems with hard drives, it can be much more noticeable than Windows probably intended.

    Runtime Broker is often just the middleman

    Runtime Broker gets blamed partly because the name sounds vague enough to be suspicious. In practice, it usually handles app permissions and background behavior for certain Windows apps and components.

    You may see it wake up when:

    • opening built-in apps
    • receiving notifications
    • changing app permissions
    • using Microsoft Store apps
    • background app tasks briefly resume

    Small bursts are normal. A Runtime Broker process that sits there using high CPU for a long stretch usually points to an app or app feature behaving badly rather than the broker itself. Notifications, broken Store apps, or permission-related loops are common suspects.

    This is a recurring Windows theme: the process you can see is not always the one that started the mess.

    Why the desktop uses the GPU when “nothing” is happening

    Desktop Window Manager using GPU resources tends to worry people because the desktop does not look demanding. It is just windows, menus, transparency, scaling, previews, animations, and whatever else Windows insists on drawing.

    That work still has to be composited, and the GPU is the right place for it.

    So some GPU use from Desktop Window Manager is normal during:

    • moving or resizing windows
    • using multiple monitors
    • running high refresh rate displays
    • watching video in a window
    • using browsers or apps with hardware acceleration
    • overlays, widgets, screen recording, or wallpaper tools

    The amount can rise with higher resolutions, HDR, multiple displays, and older or flaky graphics drivers. A few percent of GPU usage is not a fault. Unusually high usage while the system is doing very little can point to a driver issue, an overlay, a browser tab gone odd, or another app constantly forcing redraws.

    Why these processes often show up together

    Most of the names people notice are tied to a small set of background jobs:

    • servicing Windows
    • checking system state
    • scanning changed files
    • indexing content
    • handling app behavior
    • drawing the interface

    Those jobs overlap.

    A Windows update may trigger Windows Modules Installer Worker and a few services under Service Host. Changed files then attract Windows Defender. New or modified files catch the eye of Windows Search Indexer. Diagnostic or readiness checks may involve Compatibility Telemetry and WMI Provider Host. If windows, notifications, or display elements are changing, Desktop Window Manager is there too.

    That is why several of these processes can appear within the same hour and still be part of one fairly ordinary maintenance cycle.

    When to ignore it, and when to dig deeper

    Most of this becomes easier to judge if you stop staring at the process name and look at the pattern instead.

    Usually normal:

    • CPU or GPU usage rises for a few minutes after boot
    • activity appears after updates, installs, or large file changes
    • Defender scans while the PC is idle
    • Search Indexer gets busy after lots of new files
    • Desktop Window Manager shows light GPU activity during normal desktop use
    • WMI Provider Host or Runtime Broker spikes briefly and then settles

    More suspicious:

    • the same process runs hot for hours
    • the machine stays busy across several reboots
    • fans, stutter, or disk thrashing continue long after updates should be finished
    • WMI Provider Host or Runtime Broker never really calms down
    • Service Host keeps using CPU and the underlying service points back to one failing component
    • Desktop Window Manager is using far more GPU than the desktop activity seems to justify
    • the problem started right after one app, driver, utility, or peripheral was added

    Hardware matters here more than people sometimes expect. Windows background maintenance has a way of feeling harmless on a recent SSD-based system and much less harmless on an old machine with limited RAM and a mechanical drive.

    Older PCs do not see stranger behavior, just slower behavior

    A lot of “Windows is doing odd things” reports come from machines that are simply bad at hiding normal maintenance.

    The tasks are often the same. The difference is that older hardware has less headroom.

    You notice more:

    • fan noise
    • slow app launches
    • pauses while typing or switching windows
    • hard drive chatter
    • general reluctance

    On those systems, even routine background jobs stack up visibly. Defender scans, indexing, update cleanup, and telemetry all compete harder with whatever you are trying to do in the foreground. Windows is still following the same script. The cast is just older and more tired.

    What this usually means

    When Runtime Broker, Windows Defender, Windows Modules Installer Worker, WMI Provider Host, Service Host, Windows Search Indexer, Compatibility Telemetry, or Desktop Window Manager appear in Task Manager, the name alone does not tell you much.

    Timing does.

    If the activity shows up after startup, updates, installs, file changes, or long idle periods, Windows is usually catching up on work it postponed. If it clears after a while, that is ordinary system maintenance. If it keeps returning, runs for hours, or started after one specific piece of software or hardware was added, that is the point to investigate.

    Windows does a lot in the background. Task Manager just has a talent for making it look stranger than it is.

  • Does Higher Resolution Actually Matter on Smaller Monitors?

    Does Higher Resolution Actually Matter on Smaller Monitors?

    Monitor Resolutions Relative to Screen Size

    Monitor resolution makes sense only in relation to screen size.

    Man editing footage on dual monitors in a modern studio setting.
    Photo by Ron Lach on Pexels.

    A 1080p screen can look perfectly fine at 24 inches and fairly rough at 27 inches. A 4K screen can look wonderfully sharp, then immediately ask your GPU to work overtime for a benefit you may not care much about. The number on the spec sheet is only part of the story.

    The useful measure is pixel density, usually written as PPI: pixels per inch. More pixels packed into the same space means a sharper image. Fewer pixels spread across a larger panel means a softer one.

    That, plus how far away you sit, is what decides whether a monitor looks crisp, average, or a bit blocky.

    The simple idea: resolution and size have to match

    These are the common desktop resolutions:

    • 1920 × 1080 — 1080p
    • 2560 × 1440 — 1440p
    • 3840 × 2160 — 4K

    Those numbers tell you how many pixels the screen has. They do not tell you how tightly those pixels are packed.

    A few rough examples make the point:

    • 24-inch 1080p: about 92 PPI
    • 27-inch 1080p: about 82 PPI
    • 27-inch 1440p: about 109 PPI
    • 32-inch 1440p: about 92 PPI
    • 32-inch 4K: about 138 PPI

    You do not need to memorise those numbers, but they explain a lot.

    For desktop use, many people find:

    • Around 90 to 110 PPI is a comfortable normal range
    • Below roughly 90 PPI, pixels and rough text edges become easier to notice
    • Above roughly 140 PPI, the image looks very sharp, but scaling often becomes part of the conversation

    Not everyone sees the same thing equally quickly, and not everyone cares equally. Some people spot low pixel density instantly. Others are too busy actually using the PC, which is probably healthier.

    How viewing distance changes things

    A monitor sits much closer to you than a TV, so pixel density matters more.

    For typical desk use, think roughly like this:

    • About 50 to 60 cm away: lower PPI is easier to spot, especially in text
    • About 70 to 80 cm away: differences are still visible, but less harsh
    • Much farther back: resolution matters less, screen size matters more

    This is why a large TV across the room can look fine at a resolution that would seem unimpressive on a desk. It is also why a big monitor used up close can look oddly coarse if the resolution is too low for its size.

    What you do on the screen matters too:

    • Text-heavy work makes low pixel density more obvious
    • Photo work and design benefit from higher sharpness
    • Gaming and video can be more forgiving, especially from a slightly longer distance

    If you spend all day reading documents, browsing, coding, or staring at spreadsheets, you will usually notice pixel density more than someone mostly playing games.

    Where common size and resolution pairings land

    24-inch: 1080p still makes sense

    A 24-inch 1080p monitor lands around 92 PPI, which is why this combination has stayed popular for so long. It is decent for general use, affordable, and easy to drive in games.

    It is not especially sharp by modern standards, but it usually looks fine at normal desk distance. Text is readable, scaling is rarely an issue, and budget GPUs will be much happier here than at 1440p or 4K.

    A 24-inch 1440p display is noticeably crisper, at around 122 PPI. Text looks cleaner and the desktop feels roomier. This can be very nice for office work, editing, and anyone who spends hours reading small UI elements.

    The trade-off is simple enough:

    • higher price
    • more GPU load in games
    • some apps or interfaces may feel a bit small without scaling

    For budget gaming, 24-inch 1080p remains sensible. For desktop sharpness, 24-inch 1440p is clearly better if you are willing to pay for it.

    27-inch: this is where 1080p starts to wear thin

    A 27-inch 1080p monitor drops to roughly 82 PPI. That is low enough that many people notice it quickly, especially with text, icons, and fine edges.

    It is not unusable. It is just not very refined at normal desk distance.

    This pairing mostly makes sense if:

    • price matters more than clarity
    • you want a larger screen without increasing GPU load
    • the monitor is used mostly for gaming rather than text-heavy work

    If you sit close, 27-inch 1080p can look a little stretched. Some people tolerate it happily. Some cannot unsee it once they notice it. Both reactions are common.

    A 27-inch 1440p screen lands around 109 PPI, and that is why it gets recommended so often. It looks clearly sharper than 1080p, gives more desktop space, and usually works well at 100% scaling.

    For mixed use, this is one of the easiest monitor choices to defend:

    • sharp enough to feel like an upgrade
    • not so dense that scaling becomes annoying
    • much easier to run than 4K
    • good for both work and gaming

    A 27-inch 4K monitor pushes density to about 163 PPI, which is very sharp indeed. Text can look excellent. Fine detail looks superb. Photos and high-resolution media benefit.

    The catch is equally predictable:

    • most people will want scaling
    • it costs more
    • 4K gaming is much harder on the GPU

    For productivity and creative work, 27-inch 4K can be great. For gaming, it depends heavily on your hardware and expectations. Buying 4K because “more pixels is better” is a good way to spend extra money and then spend your evenings adjusting graphics settings.

    32-inch: 4K starts to feel more convincing

    Sleek gaming desk setup with multiple screens and blue neon lighting, perfect for tech enthusiasts.
    Photo by Nikhil Soni on Pexels.

    A 32-inch 1440p monitor comes out at roughly 92 PPI. That is basically the same pixel density as 24-inch 1080p.

    This surprises people sometimes. The screen is much larger, but it is not sharper. You get a bigger image, not a denser one.

    That can still be fine if you want:

    • a large display for gaming
    • a screen you sit slightly farther from
    • lower GPU demand than 4K

    It is less appealing if you want crisp text at close range. For desktop work, 32-inch 1440p often looks softer than buyers expect.

    A 32-inch 4K screen sits around 138 PPI, which is a strong fit for a large desk monitor. It looks sharp without being quite as scaling-dependent as 27-inch 4K for many users. You get plenty of workspace, very good text clarity, and a large panel that actually justifies the resolution.

    This is one of the more sensible “big and sharp” combinations, assuming:

    • you can afford it
    • your PC can handle it
    • your desk is large enough that the monitor does not become overpowering

    Ultrawides follow the same rule, just sideways

    Ultrawides are not exempt from basic pixel math.

    A 2560 × 1080 ultrawide can look fairly coarse on larger panels because the vertical pixel count is still only 1080. You get width, but not much extra sharpness.

    A 3440 × 1440 ultrawide is often a much better match around 34 inches. It gives more workspace and better pixel density without becoming absurdly demanding.

    A 5120 × 1440 display offers a huge amount of horizontal space, but it also asks more from your GPU. It is excellent for some workloads, less excellent if your graphics card already sounds slightly offended by 1440p.

    The same question still applies: are there enough pixels for the size and distance you actually use?

    Why the highest resolution is not automatically the best choice

    More pixels cost performance

    For gaming, resolution is directly tied to GPU workload.

    Moving from 1080p to 1440p is a meaningful jump. Moving from 1440p to 4K is much heavier again. More pixels per frame means lower frame rates unless the hardware is strong enough to absorb it.

    That can leave you with a monitor that is technically impressive but not especially enjoyable to game on.

    A good 1440p setup often makes more sense than a compromised 4K one.

    Scaling is real, and some apps still behave oddly

    High-density monitors can make text and interface elements too small at native scaling. Modern operating systems handle display scaling reasonably well, but not every app does it gracefully.

    This matters most on smaller 4K screens, where sharpness is excellent but usability can get fiddly. If you use older software, odd enterprise tools, or random utilities that look like they survived from 2009 by sheer stubbornness, scaling problems are not hypothetical.

    Extra sharpness has diminishing returns

    At a normal desk distance, there is a point where more resolution stops feeling transformative and starts feeling merely nice.

    That point depends on your eyesight, your workload, and how close you sit. Someone editing photos all day may value 4K far more than someone mostly gaming from 75 cm away.

    A 27-inch 1440p monitor is popular partly because it sits in a very practical middle ground. It looks sharp enough to be satisfying without dragging in all the compromises of 4K.

    Resolution is only one part of image quality

    A mediocre 4K monitor is still mediocre.

    Panel quality matters too:

    • contrast
    • colour accuracy
    • brightness
    • motion handling
    • viewing angles
    • backlight consistency

    A well-balanced 1440p monitor can be a better screen overall than a disappointing 4K one. Resolution helps, but it does not fix everything.

    Sensible choices for most people

    If you want practical pairings rather than a spreadsheet exercise, these are the combinations that usually make the most sense:

    • 24-inch 1080p — budget-friendly, fine for general use and mainstream gaming
    • 24-inch 1440p — sharper, better for text and desktop work
    • 27-inch 1440p — the easiest all-round recommendation
    • 32-inch 4K — a strong choice for a large, sharp desktop display
    • 34-inch ultrawide 3440 × 1440 — a good balance for ultrawide use

    More situational options:

    • 27-inch 1080p — acceptable if cost and gaming performance matter more than sharpness
    • 27-inch 4K — excellent clarity, but scaling and GPU demands matter
    • 32-inch 1440p — fine if you want size more than crispness

    What to choose based on how you use your PC

    Choose 1080p if:

    • you are on a tighter budget
    • your monitor is smaller
    • gaming performance matters more than desktop sharpness
    • your GPU is modest or older

    Choose 1440p if:

    • you want a clearer image without going overboard
    • you use a 27-inch monitor
    • you split time between work and gaming
    • you want a good balance of sharpness and performance

    Choose 4K if:

    • you care a lot about text clarity and fine detail
    • you use a larger screen
    • you do photo, design, or detail-heavy work
    • your PC is capable enough to run it properly

    A monitor is not better just because the resolution number is bigger. The best choice is the one that fits the screen size, your viewing distance, your workload, and the PC attached to it.

    For most desks, the practical standouts are still pretty straightforward: 24-inch 1080p, 27-inch 1440p, and 32-inch 4K. The rest depends on budget, eyesight, and how much punishment your GPU is expected to take.

  • How Much RAM Does a PC Really Need?

    How Much RAM Does a PC Really Need?

    What RAM to Use

    Choosing RAM is less about picking a favourite and more about buying what your PC can actually use.

    Your motherboard and CPU usually decide the big things first:

    • DDR generation: DDR3, DDR4, or DDR5
    • Form factor: DIMM or SO-DIMM
    • ECC support: if applicable

    What you normally get to choose is the rest: capacity, speed, timings, and whether you want one stick or a matched pair.

    That matters, but not equally. For most people, enough RAM is the first priority. After that, aim for a sensible speed for your platform and do not pay silly money for tiny gains.

    First, check what your system supports

    Before looking at any kit, confirm these basics:

    • DDR generation your system uses
    • DIMM or SO-DIMM
    • Maximum supported capacity
    • Supported speeds
    • ECC or non-ECC

    You cannot mix DDR generations. A DDR4 system does not take DDR5, and a DDR3 board is not secretly waiting for a modern upgrade. The slots are different, the electrical requirements are different, and the memory controller has to support the standard in the first place.

    If you are upgrading a laptop or prebuilt PC, check the manual or manufacturer specs. Guessing is a good way to buy RAM twice.

    DDR3 vs DDR4 vs DDR5

    These are different generations of memory. Newer generations offer more bandwidth and usually higher module capacities, but they are not interchangeable.

    DDR3

    DDR3 belongs to older desktops and laptops.

    It is still usable for light work:

    • web browsing
    • office tasks
    • media playback
    • older games

    Where DDR3 starts to feel dated is modern gaming, heavier multitasking, and workloads that lean hard on memory bandwidth or need lots of capacity. If you have an older DDR3 system, the sensible move is usually to add enough RAM to make the machine comfortable, not to expect miracles from tuning it.

    DDR4

    DDR4 has been the mainstream standard for years and is still common for both new-ish and older systems.

    For most people, DDR4 remains perfectly adequate for:

    • gaming
    • home and office use
    • schoolwork
    • moderate content creation
    • general multitasking

    It is mature, widely available, and usually easier on the budget than DDR5. A decent DDR4 kit with enough capacity is often a better choice than an ultra-fast kit bought mostly for bragging rights.

    DDR5

    DDR5 is the current standard on newer platforms.

    It offers higher bandwidth than DDR4 and tends to make the most sense in:

    • new gaming builds on current platforms
    • higher-end productivity PCs
    • heavy multitasking systems
    • workstations with large projects or data-heavy software

    DDR5 can improve gaming performance, but the size of that improvement depends heavily on the rest of the system. In CPU-limited games, faster memory can help. At higher resolutions, where the graphics card is doing most of the heavy lifting, the gap often shrinks.

    DIMM and SO-DIMM

    This part is straightforward.

    DIMM

    DIMM is the full-size RAM used in most desktop PCs.

    If you are building or upgrading a standard tower desktop, this is what you are looking for.

    SO-DIMM

    SO-DIMM is the smaller format used in many laptops and mini PCs.

    If the machine takes laptop-style removable RAM, it will usually be SO-DIMM.

    DIMM and SO-DIMM are not interchangeable, even if both are DDR4 or both are DDR5. Same family, different shape, different slot.

    Also worth checking: some laptops have soldered memory instead of removable modules. In those systems, the upgrade path is mostly wishful thinking.

    ECC RAM: who actually needs it

    ECC stands for Error-Correcting Code memory. It can detect and correct certain memory errors automatically.

    That is useful in systems where stability and data integrity matter more than raw value:

    • servers
    • workstations
    • systems running virtual machines all day
    • scientific or technical workloads
    • business-critical machines
    • long-running compute jobs

    For a normal home or gaming PC, non-ECC RAM is usually the right answer. It is more common, usually cheaper, and widely supported on consumer platforms.

    ECC is about reliability, not extra speed. It is not a gaming upgrade. Your frame rate will not salute respectfully because you bought workstation memory.

    RAM speed: how much it matters

    RAM speed is shown as ratings like:

    • DDR4-3200
    • DDR4-3600
    • DDR5-5600
    • DDR5-6000

    Higher numbers mean more bandwidth. That can help when the CPU or integrated graphics needs to move data through memory quickly.

    Where faster RAM can make a noticeable difference:

    • CPU-limited gaming
    • integrated graphics, which use system RAM as video memory
    • some content creation tasks
    • code compilation
    • compression
    • certain simulation or productivity workloads

    Where it usually matters much less:

    • web browsing
    • office apps
    • video streaming
    • general desktop use
    • gaming scenarios where the GPU is already the bottleneck

    This is why RAM speed discussions often sound more dramatic online than they feel on an actual PC. Faster RAM can help. It just is not usually the first thing holding a system back.

    RAM timings, without the ceremony

    Timings are the delay values on a RAM kit, often shown as something like CL16 or CL30.

    Lower timings mean lower latency, all else being equal. The catch is that speed and timings have to be considered together. A kit with a higher data rate and looser timings can still outperform a slower kit with tighter timings.

    T-Force Delta RGB DDR5 memory modules on vibrant yellow surface.
    Photo by Andrey Matveev on Pexels.

    So yes, timings matter. Usually not enough to obsess over unless you are tuning a performance build and the prices are close.

    For most buyers, the sensible approach is:

    • avoid unusually slow kits
    • avoid badly overpriced “enthusiast” kits
    • buy RAM that suits the platform and budget
    • prioritise capacity before chasing tiny latency gains

    You do not need to become a part-time memory analyst to buy decent RAM.

    Capacity matters more than speed for most people

    This is the part people underestimate.

    A PC with too little RAM starts leaning on the storage drive as overflow memory, which is much slower. That is when the whole system begins to feel sticky, especially with lots of apps or browser tabs open.

    8GB

    Still workable for:

    • very basic use
    • office tasks
    • light browsing
    • older systems

    It is not a great fit for modern gaming or heavier multitasking.

    16GB

    For most people, this is the current baseline.

    It suits:

    • mainstream gaming
    • home and office use
    • schoolwork
    • general multitasking

    If you are buying a general-purpose PC today, 16GB is the safe starting point.

    32GB

    This makes sense for:

    • newer games with background apps running
    • streaming while gaming
    • content creation
    • development work
    • larger photo or video projects
    • people who routinely have far too many things open

    64GB and above

    This is mostly workstation territory:

    • heavy video editing
    • 3D work
    • virtual machines
    • simulation
    • large datasets
    • professional workloads with genuinely high memory use

    More RAM is only useful if your workload can use it. There is no prize for having 128GB to browse the same four websites.

    What to buy for different uses

    Here is the simple version.

    Basic home or office PC

    Aim for 16GB if the system supports it.

    If you are upgrading an older DDR3 or DDR4 machine for email, documents, and web use, adding enough memory will usually do more than buying a slightly faster kit.

    Gaming PC

    Start at 16GB.
    Go to 32GB if you play newer games, multitask heavily, stream, or want more headroom.

    For the RAM itself:

    • on DDR4, a sensible mid-range kit is usually the sweet spot
    • on DDR5, balanced speed and timings are usually better value than chasing the fastest number on the shelf

    If the budget forces a choice between slightly fancier RAM and a better graphics card, the graphics card usually deserves the money more.

    Laptop upgrade

    Check three things before buying anything:

    • does it use SO-DIMM or soldered memory?
    • how many slots are there?
    • what capacity and speed does it support?

    A jump from 8GB to 16GB is often very noticeable on a laptop. A jump from one decent RAM speed to a slightly higher one often is not.

    Content creation and heavier work

    For video editing, development, large spreadsheets, 3D work, and similar tasks, 32GB is a sensible place to start. For serious professional workloads, 64GB or more may be appropriate.

    Speed can help, especially on newer platforms, but once projects get large, capacity tends to matter more.

    Workstation or reliability-focused system

    If the machine is doing scientific work, business-critical tasks, virtualisation, or long compute jobs, prioritise:

    • platform compatibility
    • stability
    • enough capacity
    • ECC, if the system supports it

    This is the boring answer, which is exactly what you want from a workstation.

    One stick or two?

    Most systems perform better with two matching RAM modules than with one, because they can run in dual-channel mode.

    Common examples:

    • 2x8GB is often better than 1x16GB
    • 2x16GB is often better than 1x32GB

    Dual-channel can improve:

    • gaming performance
    • integrated graphics performance
    • some memory-sensitive workloads

    Not every system behaves the same way, and some laptops have unusual slot layouts, so it is still worth checking the manual. But in general, matched pairs are the safer bet.

    The sensible answer

    Use the RAM your system supports, buy enough of it, and then worry about speed.

    If you want a quick rule of thumb:

    • DDR3: only for older systems
    • DDR4: still a strong choice for many PCs
    • DDR5: the right fit for newer platforms and higher-end builds
    • DIMM: desktop PCs
    • SO-DIMM: laptops and many mini PCs
    • ECC: for workstations, servers, and reliability-focused systems
    • 16GB: solid baseline for most people
    • 32GB or more: better for heavier gaming, creation work, and demanding multitasking

    Most RAM buying mistakes are not about timings or a missing 200 MT/s on the spec sheet. They are much simpler: buying the wrong type, buying too little, or paying extra for specs the machine will barely notice.

    Related reading

  • Backup Raid Configurations

    Backup RAID Configurations: What Each One Does and What It Doesn’t

    People often look at RAID for backup storage because it seems like a tidy solution: more space, some protection against drive failure, maybe better performance too.

    Detailed view of a black data storage unit highlighting modern technology and data management.
    Photo by Jakub Zerdzicki on Pexels.

    Fair enough. The important catch is that RAID is not a backup. It can make a storage system more resilient. It does not replace having another copy of your data somewhere else.

    That matters most with backup systems, because a backup that fails in the same way as the original is not doing much useful work.

    RAID helps with drive failure, not every kind of data loss

    A RAID array may let you keep running if a drive dies. Depending on the level, that can be very useful. It does not protect you from:

    • accidental deletion
    • corrupted files
    • ransomware
    • theft
    • fire or flood
    • power problems
    • enclosure or controller failure in some setups
    • user error, still one of the great constants in computing

    If your backup data matters, you still want at least one separate copy elsewhere. Different device, different place, ideally different failure path.

    What RAID is, briefly

    RAID stands for Redundant Array of Independent Disks. It combines multiple drives into one logical volume or storage pool.

    What you get depends on the RAID level:

    • more speed
    • more fault tolerance
    • better usable capacity
    • some compromise between them

    There is no RAID level that gives you all of those perfectly. Storage would be much less annoying if there were.

    The RAID levels people actually use

    RAID 0

    RAID 0 stripes data across multiple drives for speed and full combined capacity.

    Two 4TB drives in RAID 0 give you 8TB usable. They also give you zero redundancy. If either drive fails, the array is gone.

    This makes RAID 0 a poor fit for backup storage. It is sometimes useful for temporary workspace, scratch disks, or fast disposable data. For backups, it is the wrong kind of exciting.

    Where it makes sense

    • temporary editing cache
    • scratch storage
    • data you can recreate easily

    Where it doesn’t

    • backup targets
    • long-term file storage
    • anything you would be annoyed to lose

    Expansion

    Expansion support varies a lot. Some platforms can grow a RAID 0 array, many do not do it neatly, and rebuilding from scratch is often simpler.

    RAID 1

    RAID 1 mirrors one drive onto another. With two 4TB drives, you get 4TB usable.

    This is the simplest RAID option for backup storage if you have a two-bay system. One drive can fail and your backup volume still exists. Recovery is usually more straightforward than with parity-based arrays.

    The downside is obvious: half your raw capacity disappears into redundancy. There is no clever trick here. You are paying for simplicity.

    Where it makes sense

    • two-bay NAS boxes
    • local backup storage
    • small office file storage
    • systems where easy recovery matters more than capacity efficiency

    Where it falls short

    • large storage pools where losing 50% of capacity gets expensive fast
    • workloads where you need strong write performance gains

    Expansion

    RAID 1 is rarely graceful to expand. Usually you replace both drives with larger ones, one at a time if the system supports rebuilds. Some software platforms can migrate to another RAID level later, but you should not assume that without checking.

    RAID 5

    RAID 5 uses striping with single-drive parity. It needs at least three drives and can survive one drive failure.

    Three 4TB drives in RAID 5 give you 8TB usable. Four give you 12TB. This is why RAID 5 became so popular: better capacity efficiency than RAID 1, with some fault tolerance.

    For backup storage, RAID 5 can make sense in a small NAS where you want a decent amount of usable space without mirroring everything. The awkward part is rebuilds. On larger drives, rebuilds can take a long time, and the array is vulnerable while that is happening.

    That is one reason RAID 5 is less appealing than it used to be for big modern disks.

    Good fit for

    • home NAS backup storage
    • media archives with separate backups elsewhere
    • read-heavy file storage

    Less ideal for

    • very large arrays
    • high-write workloads
    • systems where rebuild risk is a major concern

    Expansion

    This depends much more on the platform than the RAID level itself. Some NAS systems and software RAID tools let you add drives or replace them one by one with larger models. Some do not. Product pages are often more optimistic than real life.

    RAID 6

    RAID 6 is RAID 5 with two parity blocks instead of one. It needs at least four drives and can survive two drive failures.

    With four 4TB drives, you get 8TB usable. With six, 16TB.

    For backup storage, RAID 6 is often the safer choice once arrays get larger or the drives themselves are large enough that rebuild times stop being a small detail. You lose more usable capacity than RAID 5, and writes are usually slower, but you get more breathing room during a rebuild.

    Good fit for

    • larger NAS systems
    • backup arrays using high-capacity drives
    • storage where uptime matters more than squeezing out every last terabyte

    Less ideal for

    • small arrays where the extra parity cost feels heavy
    • workloads that care a lot about write speed

    Expansion

    Same story as RAID 5: possible on some platforms, awkward on others.

    RAID 10

    RAID 10 combines mirroring and striping. You need at least four drives. It gives you the performance advantages of striping with the simpler fault model of mirrored pairs.

    Four 4TB drives in RAID 10 give you 8TB usable.

    This is often the practical choice for people who want speed and redundancy without parity rebuild headaches. It is especially attractive for heavier workloads like virtualization, databases, and active project storage.

    For backup storage alone, RAID 10 is sometimes overkill. It is excellent, but you pay for it by losing half the raw capacity.

    Good fit for

    • performance-focused NAS boxes
    • active project storage
    • virtualization hosts
    • mixed workloads where write speed matters

    Less ideal for

    • budget-sensitive bulk backup storage
    • anyone trying to maximize usable capacity

    Expansion

    RAID 10 usually expands in mirrored pairs, not one drive at a time. Planning ahead helps.

    JBOD and spanning

    JBOD usually means Just a Bunch Of Disks, though vendors do a fine job of using the term inconsistently.

    In one setup, each drive is exposed separately. In another, drives are combined into one larger volume without redundancy. That second version is often closer to spanning than true JBOD, but the naming is not always tidy.

    For backup storage, JBOD can be useful if you want to use mixed-size drives cheaply and you already have proper backups elsewhere. It is not a substitute for redundancy.

    Why people use it

    • full capacity is usable
    • mixed drive sizes are easier to work with
    • setup is often simple
    • individual disks may be easier to access outside the array

    Why it can go wrong

    • little or no redundancy
    • if one disk in a spanned volume fails, you may lose part or all of the volume
    • performance improvements are usually minimal

    JBOD is fine for non-critical bulk storage. It is a poor way to create a backup target if that backup target is your only safety net.

    Which RAID levels make sense for backup storage?

    This is the part the title promised, so let’s not pretend every RAID level is equally sensible here.

    For a simple local backup destination

    A single large drive is often enough. If you want the backup storage itself to survive a drive failure, RAID 1 is the usual answer.

    Good options:

    • one large external drive
    • two-drive RAID 1 enclosure
    • two-bay NAS with mirrored drives

    This works well for straightforward PC backups, photo libraries, and home office data. You still want another copy somewhere else if the files matter.

    For a larger home NAS used for backups

    Once you have three or more drives, the choice usually becomes:

    • RAID 5 if usable capacity matters and the array is not huge
    • RAID 6 if you have more drives, larger drives, or lower tolerance for rebuild risk
    • RAID 10 if performance matters more than capacity efficiency

    For many home users, RAID 5 or RAID 6 is the sensible middle ground in a NAS. For small two-bay systems, RAID 1 is simpler.

    For external workstation backup and project storage

    If the enclosure is doing double duty as active storage and backup target:

    • RAID 1 is a solid conservative option
    • RAID 5 can make sense in larger enclosures
    • RAID 10 suits heavier professional workloads

    RAID 0 only belongs here if the data is temporary and backed up elsewhere. Using RAID 0 for the only copy of anything important is how people end up pricing data recovery services with a slightly haunted expression.

    Software RAID, hardware RAID, and motherboard RAID

    The RAID level is only part of the decision. How the array is managed matters too.

    Software RAID

    Software RAID is handled by the operating system or storage platform. Examples include Linux mdadm, Windows Storage Spaces, ZFS-based systems, and many NAS operating systems.

    For home servers and backup systems, software RAID is often the sensible option.

    Why it appeals

    • no need for a dedicated RAID card
    • often cheaper
    • usually more flexible
    • easier to migrate in some cases
    • modern CPUs can generally handle the overhead just fine in home and small office setups

    Where it gets awkward

    • boot drive setups can be trickier
    • portability depends on the platform
    • some implementations are much better than others

    If you are building a backup server or NAS on standard PC hardware, software RAID is usually the first thing worth considering.

    Hardware RAID

    Hardware RAID uses a dedicated controller card or a RAID-capable enclosure to manage the array.

    Proper hardware RAID can be useful in server environments, especially where you need enterprise features or established management tools. For ordinary consumer backup storage, it is often less compelling than the label suggests.

    Pros

    • can simplify management in some server setups
    • may offer cache protection features on higher-end controllers
    • works well in systems designed around that controller

    Cons

    • extra cost
    • recovery may depend on the same controller family
    • controller failure can become its own problem
    • cheap implementations are often not very impressive

    A failed RAID card is a fine way to discover how portable your data was not.

    Motherboard RAID

    Motherboard RAID sits in the awkward middle. It is usually presented in BIOS or UEFI, but often depends on drivers and the host CPU rather than doing everything on dedicated hardware.

    It can work. It is just rarely the cleanest option for a backup build. Good software RAID is often easier to live with.

    Internal arrays, external enclosures, and NAS boxes

    You can integrate RAID into a system in a few different ways.

    Internal RAID

    Drives live inside the PC or server case and connect directly to the motherboard or controller.

    Best for

    • DIY NAS builds
    • workstations with spare bays
    • people who want direct control over the platform

    Trade-offs

    • limited by case space and cooling
    • expansion may mean replacing the case, PSU, or controller
    • more noise and heat inside the main system

    External direct-attached RAID enclosures

    These connect over USB, Thunderbolt, eSATA, or similar interfaces and present storage to one host system.

    Best for

    • workstations that need more storage without opening the case
    • editors and creators using large local project files
    • backup targets for a single main PC

    Trade-offs

    • speed depends heavily on the interface
    • enclosure quality matters
    • some use proprietary management or formatting
    • if the enclosure electronics fail, recovery may be more awkward than with plain internal drives

    Useful, yes. Magical, no.

    NAS and separate network enclosures

    A NAS is its own storage box on the network, usually with its own operating system and RAID management.

    Best for

    • backups from multiple PCs
    • shared household or office storage
    • keeping backup storage separate from the main computer

    Trade-offs

    • higher upfront cost
    • more setup than a USB drive
    • network speed can limit performance
    • some NAS-specific RAID schemes are not especially portable outside that brand or platform

    For backup use, a NAS is often the nicest option if more than one device needs to send data to the same place.

    Expansion is where plans either help or vanish

    RAID expansion depends on more than the RAID level itself:

    • how many bays you started with
    • whether your platform supports online expansion
    • whether all drives are the same size
    • how long rebuilds take
    • how much downtime you can accept

    The broad pattern looks like this:

    • RAID 0: often easier to rebuild than expand properly
    • RAID 1: usually expanded by replacing both drives with larger ones
    • RAID 5/6: may support adding drives or replacing them one at a time, but rebuilds can be long
    • RAID 10: usually expanded by adding another mirrored pair
    • JBOD: easiest for mixed-drive growth, offers little protection by itself

    If you expect to grow, buy more bays than you need today. People rarely regret having spare bays. They do regret discovering that “future expansion” meant replacing the entire box.

    A sensible way to choose

    Pick the storage role first, then the RAID level.

    Ask:

    1. Is this for backups, active working data, or both?
    2. Do I need the storage to stay online if one drive fails?
    3. How many drive bays do I actually have?
    4. Am I likely to expand later?
    5. Is capacity more important than performance?
    6. Do I already have a separate backup copy?

    Then the usual answers look like this:

    • Two-drive backup box: RAID 1
    • Small NAS where capacity matters: RAID 5
    • Larger NAS with bigger drives: RAID 6
    • Performance-heavy storage that also needs redundancy: RAID 10
    • Cheap bulk storage with backups elsewhere: JBOD
    • Never for sole backup storage: RAID 0

    Conclusion

    For backup storage, the best RAID setup is usually the boring one.

    • RAID 1 makes the most sense for simple two-drive backup systems.
    • RAID 5 works for smaller multi-drive NAS boxes where usable capacity matters.
    • RAID 6 is often the better choice for larger arrays and larger disks.
    • RAID 10 is excellent if you want speed and resilience and can live with the capacity hit.
    • JBOD is flexible, but it is not protective.
    • RAID 0 has no real place as the only storage for backups.
    External hard drive connected to a laptop, showcasing portable storage solution.
    Photo by Budget Bizar on Pexels.

    Use RAID to reduce downtime and survive a drive failure. Use backups to recover your data when something broader goes wrong. You usually need both, and they are not the same job.

  • How to Check if Your PC Has an SSD

    How to Check if Your PC Has an SSD

    How to Check if Your PC Has an SSD

    The fastest way to check is in Task Manager.

    On Windows 10 and Windows 11:

    1. Right-click the Start button
    2. Select Task Manager
    3. If it opens in the simple view, click More details
    4. Open the Performance tab
    5. Click Disk 0 on the left, then any other disks listed

    Near the top right, Windows will usually label the drive as SSD or HDD.

    If your PC has more than one drive, check each one. Quite a few systems use an SSD for Windows and a larger hard drive for files.

    Check in Optimize Drives

    This is another quick built-in method.

    1. Open Start
    2. Type Defragment and Optimize Drives
    3. Open it
    4. Check the Media type column

    You’ll usually see one of these:

    • Solid state drive
    • Hard disk drive

    It’s one of the clearest places to check, which is mildly surprising given where Microsoft hid it.

    If Windows is vague, check the model number

    Sometimes Windows doesn’t identify the drive cleanly. In that case, look up the model.

    In Device Manager

    1. Right-click Start
    2. Select Device Manager
    3. Expand Disk drives
    4. Note the drive name or model number

    Search that model online. The manufacturer’s specs should tell you whether it’s:

    • a SATA SSD
    • an NVMe SSD
    • an HDD

    This is also the best option if you want to know what kind of SSD you have, not just whether one exists.

    PowerShell and System Information

    These are useful if you want a bit more detail.

    PowerShell

    1. Right-click Start
    2. Open Windows PowerShell or Terminal
    3. Run:
    Get-PhysicalDisk
    

    Check the MediaType field. You may see:

    • SSD
    • HDD
    • Unspecified

    If it says Unspecified, don’t read too much into it. Windows is not always very good at labeling storage.

    System Information

    1. Press Windows + R
    2. Type msinfo32
    3. Press Enter
    4. Go to Components > Storage > Disks

    This usually shows the model name, capacity, and interface details. It may not plainly say “SSD,” but it often gives you enough to identify the drive.

    Checking the hardware directly

    If Windows is barely cooperating, or you just want to confirm it physically, inspect the drive itself.

    Close-up of a person holding a Samsung T5 Portable SSD box, emphasizing modern technology.
    Photo by Luis Quintero on Pexels.

    Desktop PC

    Shut the PC down, unplug it, and remove the side panel.

    You’re looking for one of these:

    • 2.5-inch SSD: small, thin rectangular drive
    • 3.5-inch hard drive: larger, thicker metal drive
    • M.2 SSD: slim board mounted directly to the motherboard

    An M.2 drive is not automatically fast just because it’s small, but it is an SSD-type form factor, not an old spinning hard drive.

    Laptop

    This depends heavily on the laptop. Some are easy to open. Some behave as if the manufacturer would rather you didn’t. If you’re not comfortable removing the bottom cover, stick with the Windows methods.

    Signs your PC probably has an SSD

    This is only a clue, not proof.

    Your PC is more likely to have an SSD if it:

    • boots fairly quickly
    • opens apps without much waiting
    • makes little or no drive noise
    • is a newer mid-range or higher-end system

    A mechanical hard drive often makes spinning or clicking sounds and tends to feel slower during startup, updates, and large file loads.

    Still, overall speed can be misleading. A modern PC can feel decent even with a hard drive, and an older PC with an SSD can still feel slow if the CPU, RAM, or both are struggling.

    If your PC has both an SSD and a hard drive

    This is common, and it changes the question a bit.

    You may have:

    • an SSD for Windows and programs
    • an HDD for documents, photos, videos, or game libraries

    That’s a sensible setup. The important part is where Windows is installed.

    How to check which drive Windows uses

    In Task Manager > Performance, click each disk and look at the activity while the system is busy. That can give you a rough clue, but there’s a cleaner method:

    1. Right-click Start
    2. Select Disk Management
    3. Look for the partition marked C:
    4. On that same disk, look for labels such as Boot, System, or Page File

    That disk is the one Windows is using as its main system drive.

    If your PC has an SSD but Windows is installed on the hard drive, you won’t get most of the SSD’s benefit. You’ll still own an SSD, technically. It just won’t be doing the job people usually buy one for.

    If your PC doesn’t have an SSD

    If it’s running only a hard drive, an SSD upgrade is usually one of the most effective ways to make the system feel faster.

    It usually improves:

    • boot times
    • app launches
    • file searches
    • Windows updates
    • general responsiveness

    It usually does not improve:

    • CPU speed
    • graphics performance
    • gaming frame rates, unless storage load times were the bottleneck

    Whether the upgrade is easy depends on the machine:

    • Desktops are usually straightforward
    • Laptops vary a lot
    • Older systems may only support SATA SSDs
    • Newer systems may support NVMe M.2 SSDs

    Check what your motherboard or laptop supports before buying anything. Storage upgrades are useful. Buying the wrong one is less so.

  • Windows Update Using CPU While Idle

    Seeing CPU usage when the computer appears to be doing nothing can make people uneasy. You open Task Manager expecting everything to be quiet, yet something related to Windows Update is using processor time. It can look like the system is busy even though no programs are open.

    In most cases, this is normal Windows behaviour. Updates are one of the main ways Windows keeps itself secure and stable, and a surprising amount of work happens quietly in the background. When the computer becomes idle, Windows often takes the opportunity to catch up on maintenance tasks that it avoids doing while you are actively using the system.

    The result is that CPU usage appears precisely when the computer seems least busy.


    What Is Normal

    It is normal for Windows Update to use some CPU while the computer is idle.

    Windows handles updates in several stages. Downloading updates is only one part of the process. The system also needs to:

    • Check for new updates
    • Verify downloaded files
    • Prepare update components
    • Install background components
    • Clean up older update files

    Much of this work is done through background services rather than a single obvious program. You may see names such as Windows Modules Installer Worker, Service Host, or other Windows processes in Task Manager.

    CPU usage during these periods may range from barely noticeable to moderately high for a short time. On many systems it might sit somewhere between 5% and 30% while work is being done. Occasionally it can spike higher for brief periods.

    The key point is that Windows intentionally schedules this type of background activity when the system is idle. The operating system assumes this is the least disruptive time to run maintenance tasks.


    What Is Not Normal

    While some CPU usage from Windows Update is expected, a few patterns are less typical.

    For example:

    • CPU usage remaining very high for many hours without stopping
    • The same update process appearing to run continuously for days
    • The system becoming extremely slow whenever the update service runs

    These situations do happen occasionally, but they are not the normal behaviour of a healthy update cycle. Usually when Windows Update uses CPU during idle periods, the activity settles down once the task is finished.

    Most update work completes quietly in the background and disappears without the user noticing.


    Why It Looks Worse Than It Actually Is

    Many people only check Task Manager when something seems unusual. You notice the computer feels slightly warm, the fan spins up, or the CPU graph is not flat. Naturally the assumption is that something must be wrong.

    In reality, you have simply caught Windows doing routine work.

    Modern operating systems are designed to make use of idle time. When nothing else is happening, the system takes advantage of that spare processing power. Instead of leaving the CPU completely unused, Windows uses it for maintenance tasks like updates, indexing, background scanning, and system optimisation.

    From the outside, this can look like unexplained activity. But from Windows’ point of view, the computer is simply being productive while it has the chance.

    Once you start actively using the machine again, most of these tasks slow down or pause automatically.


    Why Task Manager Can Be Misleading

    Task Manager is useful, but it can also give a slightly distorted view of what the system is doing.

    One reason is that it shows instant snapshots of CPU usage. If you happen to open it during the busiest moment of a background task, it can look dramatic even if the activity only lasts a few minutes.

    Another issue is how Windows groups services. Many background components run under something called Service Host processes. Inside that container may be several different services working together, including parts of Windows Update.

    This makes it difficult to see exactly what stage the update process is in. You might see CPU usage from a service host and assume it is stuck or malfunctioning when it is actually performing verification or cleanup tasks.

    Windows also prioritises foreground programs over background services. So even if the update process appears active in Task Manager, it is typically running at a lower priority than the applications you are using.

    This is why background activity rarely slows the computer as much as the CPU percentage might suggest.


    What Windows Update Is Actually Doing

    When Windows Update uses CPU while the system is idle, it is usually performing one of several routine jobs.

    Checking for Updates

    Windows regularly checks Microsoft’s update servers to see if anything new is available. This involves scanning the system, comparing installed components with update catalogues, and determining what is needed.

    The scanning process uses some CPU because Windows needs to inspect installed packages and system files.

    Preparing Updates

    Once updates are downloaded, they are not always installed immediately. Windows may prepare components in advance so the installation process later is faster and more reliable.

    This preparation work can involve unpacking files, verifying digital signatures, and staging update components.

    Installing Background Components

    Some updates install silently in the background without requiring a restart. Security definitions, servicing stack updates, and certain system components may be applied while the system is running.

    These installations often cause temporary CPU activity.

    Cleaning Up Old Update Files

    After updates are installed, Windows performs cleanup operations. Temporary installation files, outdated system packages, and replaced components may be removed.

    This process reduces disk usage but requires some processing time.


    Why Idle Time Is When It Happens

    Windows is designed to avoid interfering with what the user is doing. Heavy tasks like update preparation are usually postponed until the system becomes idle.

    From Windows’ perspective, idle simply means that the user is not actively interacting with the computer.

    This is why you may notice CPU usage increase shortly after stepping away from the keyboard. Windows detects that nothing important is happening and begins background maintenance.

    If you return and start using the computer again, the system may reduce or pause the activity.


    How Long It Usually Lasts

    In most cases, Windows Update CPU usage during idle periods does not last very long.

    Typical patterns include:

    • Short bursts lasting a few minutes
    • Occasional spikes during update checks
    • Longer activity during major update preparation

    After a larger update download, the preparation phase may run for 10 to 30 minutes depending on the system speed and the size of the update.

    Older computers with slower storage may take longer, especially if several updates are being processed at once.

    Eventually the background work completes and CPU usage returns to normal idle levels.


    When It Is Worth Investigating

    Occasional CPU usage from Windows Update is expected. However, it may be worth taking a closer look if the behaviour is unusually persistent.

    Situations that sometimes justify investigation include:

    • CPU usage staying high for several hours every day
    • The update service appearing active even after multiple restarts
    • Updates repeatedly failing to install

    Sometimes a stalled update, corrupted update cache, or network issue can cause Windows Update to retry the same operation repeatedly.

    In these cases the system may keep attempting update checks or preparation steps without completing successfully.

    Even then, the problem is usually limited to the update system itself rather than indicating a serious fault with the computer.


    Common Mistakes People Make

    When people see unexpected CPU usage, the instinct is often to stop the process immediately. This is understandable, but it can create more problems than it solves.

    A few common reactions tend to make things worse.

    Ending Update Processes

    Force-closing Windows Update services in Task Manager can interrupt installations or leave components partially configured.

    This can lead to failed updates or repeated attempts to reinstall the same update.

    Disabling Windows Update Completely

    Some users disable updates entirely to stop the background activity. This often leads to larger update problems later, particularly when the system eventually attempts to install months of missed updates at once.

    Restarting the Computer Repeatedly

    Restarting during active update preparation can reset the process before it finishes. The system then starts the work again the next time it becomes idle.

    This can make it appear as though the update system is stuck in a loop.

    Running Random “Cleanup” Tools

    Various utilities claim to fix Windows Update issues automatically. Some of these tools simply clear update files without understanding what stage the system is in, which can actually delay updates further.

    Most of the time the best approach is simply to allow Windows to finish what it started.


    A Quiet Part of Windows Doing Its Job

    Windows Update using CPU while the computer is idle is usually just background maintenance taking advantage of free system resources.

    It tends to appear suddenly because the work happens when nothing else is going on. The CPU graphs in Task Manager can make it look dramatic, but most of the activity is temporary and low priority.

    Once the update tasks are complete, the system settles back into its normal idle behaviour.

    Unless the activity continues for unusually long periods or updates repeatedly fail, this is simply part of how Windows keeps itself secure and up to date.

  • What Is Runtime Broker and Why Does It Use CPU?

    You open Task Manager because something feels slow, and near the top of the list is a process called Runtime Broker. It’s using CPU. Maybe not a lot, maybe more than you’d expect. The name isn’t helpful, and it doesn’t sound like something you installed.

    That’s usually the point where people assume malware.

    In most cases, it isn’t. Runtime Broker is a normal part of Windows. It has a specific job, and when it’s using processor time, there’s usually a clear reason.


    What Runtime Broker actually is

    Runtime Broker is a small Windows process that manages permissions for certain apps.

    Specifically, it works with modern Windows apps — the kind you download from the Microsoft Store, or built-in apps like Photos, Mail, Settings, and Weather. These apps run in a restricted environment for security reasons. They’re not allowed to freely access everything on your system.

    Runtime Broker acts as a middle layer. It checks:

    • Is this app allowed to use the camera?
    • Is it allowed to access the microphone?
    • Can it read certain files?

    It doesn’t do the work itself. It supervises it.

    Most of the time, Runtime Broker sits idle and uses almost no resources.


    What’s normal and what isn’t

    Normal behaviour:

    • Runtime Broker appears briefly in Task Manager.
    • It uses a small amount of CPU for a short time.
    • CPU usage drops back down quickly.
    • It uses very little memory.

    Not normal:

    A brief spike in CPU usage when opening Settings or a Store app is expected. Constant high usage while the system is idle is not typical.

    The difference is duration. Short activity is fine. Sustained load isn’t.


    Why it often looks worse than it is

    Task Manager shows processes in real time. If you open it during a moment when Runtime Broker is active, it can look suspicious.

    But remember what it’s doing: checking permissions and managing communication between apps and Windows. That involves short bursts of processor work.

    Modern CPUs also boost aggressively for brief tasks. So a simple permission check might briefly show 20–30% CPU usage before dropping back down.

    If you only glance at the number without watching it settle, it can feel alarming.

    Most of the time, if you leave Task Manager open for a minute, you’ll see it calm down.


    Why Task Manager can be misleading

    There are two common misunderstandings here.

    First, seeing CPU usage does not automatically mean something is wrong. The processor is designed to be used. Short bursts are normal background activity.

    Second, Runtime Broker may appear multiple times. Windows sometimes runs more than one instance if several apps need supervision.

    You might also notice that Runtime Broker shows activity even when you think nothing is open. That’s because some apps run quietly in the background. Live tiles, notifications, and sync services can trigger it.

    If you’re checking overall CPU usage on the Performance tab, it’s important to watch the graph over time. A spike that falls quickly is routine. A flat, high line that doesn’t move is different.


    Common reasons Runtime Broker uses CPU

    There’s usually a simple cause.

    1. A Store app is running or updating

    Apps like Photos, Mail, or Weather may refresh in the background. Runtime Broker checks their permissions as they run.

    If you recently opened a built-in app, that’s the likely trigger.

    2. Background app permissions

    Some apps are allowed to run in the background. They may:

    • Check for updates
    • Sync data
    • Refresh notifications

    Runtime Broker gets involved when those apps access system features.

    3. Live tiles and widgets

    On some versions of Windows, live tiles or widgets refresh content periodically. That activity can wake Runtime Broker.

    4. A misbehaving app

    Occasionally, an app doesn’t handle its permissions cleanly. It may repeatedly request access or fail to release resources properly.

    In that case, Runtime Broker looks busy, but it’s responding to the app — not acting on its own.

    5. After waking from sleep

    If you notice Runtime Broker using CPU after waking your PC from sleep, it may simply be handling background activity as apps reconnect and resume.

    That brief surge is usually temporary.


    When it resolves on its own

    In the majority of cases, Runtime Broker activity lasts seconds or a few minutes.

    You might notice:

    • A spike after logging in
    • A spike after opening Settings
    • A spike when a notification appears

    Then it drops back down.

    If you leave the system alone while it’s idle, CPU usage should return to low levels. Runtime Broker should fall near 0%.

    If that’s what you see, nothing needs fixing.


    When it’s worth investigating

    You should look deeper if:

    • Runtime Broker constantly uses high CPU for long periods.
    • CPU usage remains high even when no apps are open.
    • The system feels persistently slow.
    • The behaviour repeats every time you start Windows.

    At that point, it’s not Runtime Broker itself that’s the root problem. It’s usually an app triggering it.

    Open Task Manager and look at what else is running. If you close a particular app and CPU usage drops, you’ve found the cause.

    You can also check which apps are allowed to run in the background under Windows Settings. Disabling unnecessary background apps often reduces repeated background activity.


    What not to do

    There are a few common mistakes that create more problems than they solve.

    Don’t delete or disable Runtime Broker

    It’s a core Windows component. Ending the process temporarily is fine — Windows will restart it if needed. But trying to remove it or block it entirely can break app permissions.

    Don’t assume it’s malware

    Runtime Broker is legitimate. Its file location should be:

    C:\Windows\System32\RuntimeBroker.exe

    If it’s located elsewhere, that’s different. But in most cases, it’s genuine.

    Installing antivirus software purely because you saw Runtime Broker using CPU is unnecessary unless you have other signs of infection.

    Don’t install “optimizer” tools

    Utilities that promise to “fix high CPU usage” often add their own background services. That can increase background activity rather than reduce it.

    If the issue is a specific app, removing or updating that app is far more effective.


    A practical way to assess the situation

    If you see Runtime Broker using CPU:

    1. Sort Task Manager by CPU usage.
    2. Watch it for a few minutes.
    3. See whether it drops on its own.
    4. Close recently opened Store apps and observe any change.

    If CPU usage settles, leave it alone.

    If it doesn’t, check which app might be triggering it. Often it’s something simple like a mail app syncing or a widget refreshing repeatedly.

    The important thing is not to react to a snapshot. Watch the pattern.


    The grounded reality

    Runtime Broker exists to enforce app permissions and maintain security boundaries. It is supposed to run. It is supposed to use small amounts of processor time occasionally.

    High CPU usage for a few seconds is normal. Persistent high CPU usage for hours is not.

    In most cases, what looks suspicious is just routine background activity. Once the app finishes what it’s doing, the system returns to normal.

    If it settles, there’s nothing wrong. If it doesn’t, the cause is almost always a specific app — not Windows itself failing.

    Understanding that difference keeps you from chasing a problem that doesn’t actually exist.

  • CPU Usage High After Waking From Sleep

    You close the lid, come back later, open it up — and suddenly the fan spins up like you’ve launched a video render. Task Manager shows high CPU usage even though you haven’t opened anything heavy.

    That’s a common moment of concern. It feels like something is wrong because the machine was doing nothing a minute ago. In most cases, nothing is broken. The system is simply catching up.

    The key is understanding what normally happens when a PC wakes from sleep, and what doesn’t.


    What’s normal after waking from sleep

    Sleep mode doesn’t shut Windows down. It pauses it. Your open programs remain in memory. The processor powers down to save energy. Network connections may drop and reconnect.

    When you wake the system, Windows has to:

    • Re-establish network connections
    • Check for updates
    • Resume paused tasks
    • Sync cloud files
    • Restart certain services
    • Handle anything that was scheduled while the machine was asleep

    A brief spike in CPU usage during that period is normal. You might see 40%, 60%, even higher for a short time.

    What isn’t normal is sustained high CPU usage for an hour with no clear reason.

    Short burst? Expected.
    Constant load long after wake? Worth checking.


    Why it looks worse than it is

    Sleep creates a backlog.

    While the computer is asleep, time still moves forward. Updates are released. Emails arrive. Cloud files change. Scheduled maintenance windows pass.

    When the system wakes up, it processes those missed tasks. From your perspective, nothing is open. From Windows’ perspective, there’s background activity waiting.

    It’s a bit like opening your office in the morning and finding emails queued overnight. The work isn’t new — it was just delayed.

    The fan noise and visible CPU usage make it feel dramatic, but most of the time it’s just routine housekeeping compressed into a short window.


    Why Task Manager can be misleading after wake

    Task Manager shows what is happening right now. It doesn’t show why it started.

    After waking from sleep, you might see:

    If you open Task Manager during that initial surge, it can look alarming. But the important question isn’t “Is the CPU high?” It’s “Does it settle?”

    The Performance tab shows a graph over time. If usage spikes and gradually drops, the system is behaving normally. If it remains flat and high long after wake, something else is happening.

    Another detail people miss: the processor may ramp up to maximum speed briefly to complete tasks quickly. That’s by design. Modern CPUs boost aggressively for short bursts, which can exaggerate the impression of strain.

    High CPU usage for a few minutes after waking does not mean the processor is being damaged.


    Common causes of high CPU usage after sleep

    Most cases fall into predictable categories.

    1. Windows Update resuming work

    If an update downloaded while you were away, the system may unpack and prepare it when you wake the machine. That can use noticeable processor time.

    It often settles within 10–30 minutes.

    2. Windows Defender running a quick scan

    Security software may perform scans when the system becomes active again. If the PC was idle or asleep overnight, it may trigger a scan once you return.

    Again, temporary.

    3. Network reconnection and syncing

    Cloud storage services — OneDrive, Google Drive, Dropbox — check for changes once the internet reconnects. Email clients sync. Browsers refresh background tabs.

    This is normal background activity.

    4. Search indexing

    If files changed before sleep, Windows may update its search index after wake. That can briefly increase CPU usage.

    5. A browser restoring suspended tabs

    Some browsers suspend tabs during sleep to save memory. When you wake the PC, those tabs reload. If several media-heavy pages resume at once, CPU usage rises quickly.

    6. A driver behaving badly

    This is less common, but sometimes a device driver doesn’t resume cleanly. That can cause persistent CPU usage.

    Usually you’ll notice this because the behaviour repeats every time the PC wakes.


    When it usually resolves on its own

    For most users, the pattern is:

    1. Wake PC
    2. CPU usage spikes
    3. Fan ramps up
    4. After 5–20 minutes, everything quiets down

    That’s normal.

    If you wake the PC and immediately start working, you may overlap with those background tasks, making the system feel sluggish. If you give it a few minutes, it often settles.

    On older systems with slower drives, this settling period can be longer — especially after major Windows updates.

    If the CPU usage drops back to low levels once the system is idle again, nothing is wrong.


    When it’s worth investigating

    You should look more closely if:

    • CPU usage stays above 70–80% for extended periods
    • The same process consistently dominates after every wake
    • The system becomes unstable or freezes
    • The issue started after installing new software or drivers

    If it happens once, it’s likely routine. If it happens every time, there’s a pattern.

    In that case, check which process is at the top in Task Manager. If it’s a third-party program, try updating it. If it’s a driver-related process, check for hardware driver updates.

    If it’s always Windows Update or Defender, let it finish at least once without interrupting it. Sometimes repeated waking and sleeping prevents it from completing properly.


    What not to do

    This is where frustration makes things worse.

    Don’t force shutdown repeatedly

    If you shut the PC down mid-update or mid-scan every time you see high CPU usage, the tasks never finish. That can create a loop where the system keeps trying again after every wake.

    Let it complete once.

    Don’t disable core services

    Turning off Windows Update or Defender because they used CPU after wake is rarely a good idea. Those services exist for a reason.

    High CPU usage during maintenance is not a fault.

    Don’t install “optimizer” tools

    Third-party utilities promising to “fix high CPU after sleep” often add their own background services. That usually increases load rather than reducing it.

    If the system was stable before, adding more software isn’t the solution.

    Don’t assume hardware failure

    Sleep-related CPU spikes are almost always software-driven. A failing processor does not selectively misbehave only after sleep.

    Hardware problems show up under sustained load, not just during background activity after waking.


    A practical way to judge the situation

    When you wake your PC and notice high CPU usage:

    1. Open Task Manager.
    2. Sort by CPU usage.
    3. Identify the top process.
    4. Wait 10–15 minutes without interrupting it.
    5. Check again.

    If usage drops back to low levels while the system is idle, you’re fine.

    If it does not drop and the same process remains active every time, then you have something specific to investigate.

    Most of the time, the system simply needed a moment to resume work.


    The grounded reality

    Sleep mode isn’t a freeze-frame. It’s a pause. When you resume, Windows clears whatever built up while it was paused.

    That short burst of CPU usage is often just the system doing its job — updates, syncing, indexing, scanning. It looks dramatic because it happens all at once.

    If it settles, leave it alone. If it repeats consistently and never calms down, look at the specific process involved.

    High CPU usage after waking from sleep is common. Persistent high CPU usage long after waking is not. Knowing the difference keeps you from fixing a problem that doesn’t exist.